Mastering the Art of How to Rescreen: A Comprehensive Guide for Homeowners
Rescreening your screen door might seem like a daunting task, but with the right tools and a bit of patience, it's a project any homeowner can tackle. Whether your screen is torn from weather wear or curious pets, knowing how to rescreen can save you money and keep your home looking sharp. This guide will walk you through the essentials—from picking the right materials to handling common hiccups along the way. Let's get started on making your screen door look brand new again!
Key Takeaways
- Rescreening helps maintain your home's curb appeal and keeps bugs out.
- Having the right tools, like a spline roller and utility knife, makes the job easier.
- Choose the screen material that fits your needs—fiberglass, aluminum, or pet-resistant.
- Follow a step-by-step approach: remove the old screen, fit the new one, and secure it properly.
- Regular maintenance can extend the life of your screens and save you future hassle.
Understanding the Basics of Rescreening

What is Rescreening?
Rescreening is all about refreshing your screen door by swapping out the old, worn-out mesh for a brand new one. Over time, screens get torn, frayed, or just plain tired looking. Replacing the screen helps keep your home looking sharp and keeps those pesky bugs out. Think of it as giving your door a little facelift, making it both functional and appealing.
Why Rescreening is Important
Why bother with rescreening? Well, it's not just about looks. A good screen does wonders for keeping insects at bay while letting the fresh air flow through your home. Plus, a well-maintained screen door can improve your home's overall comfort level. It's a small fix that can make a big difference in how you enjoy your living space.
Common Misconceptions About Rescreening
There are a few myths floating around about rescreening. Some folks think it's a huge hassle or that you need a ton of tools. Not true! With the right materials and a bit of patience, anyone can tackle this project. Another misconception is that any screen material will do. In reality, choosing the right type of screen, whether it's fiberglass, aluminum, or something pet-resistant, is key to ensuring your screen lasts long and performs well.
Rescreening might seem daunting at first, but with a little guidance and the right tools, it's a manageable task that can enhance your home's comfort and appearance.
Essential Tools and Materials for Rescreening

Must-Have Tools for Rescreening
Before you get started on your rescreening project, gather all the necessary tools. Having the right tools on hand can make the process much smoother and less frustrating. Here's what you'll need:
- Screwdriver: This is essential for removing the screen door from its frame. Make sure you have the right size to avoid stripping screws.
- Utility Knife: A sharp utility knife is crucial for cutting away the old screen and trimming the new one to fit perfectly.
- Spline Roller: This handy tool helps you press the spline into the groove of the frame, securing the screen in place.
- Measuring Tape: Accurate measurements are key, so keep a measuring tape nearby to ensure everything fits just right.
- Scissors: These are useful for trimming excess screen material.
- Staple Gun (optional): Some folks prefer using a staple gun instead of a spline to hold the screen. It’s not necessary, but it’s good to have if you choose this method.
Choosing the Right Screen Material
Selecting the right screen material is just as important as having the right tools. There are a few options, each with its own benefits:
- Fiberglass: Lightweight and affordable, fiberglass screens are a popular choice for many homeowners. They’re easy to work with and provide good airflow.
- Aluminum: If you need something a bit more durable, aluminum screens are tougher and resist tears better, making them ideal for high-traffic areas.
- Pet-Resistant: Got pets? Pet-resistant screens are heavier and designed to withstand scratches and playful paws.
Think about your specific needs and the environment where the screen will be used when choosing your material.
Additional Supplies for a Smooth Rescreening
To make sure your rescreening project goes off without a hitch, consider gathering some additional supplies:
- Spline: This is what holds the screen in place. Make sure you get the right size for your frame.
- Replacement Corners or Clips: Sometimes, the corners or clips that hold the screen frame together can get damaged. Having some replacements on hand can save you a trip to the hardware store.
- Weatherstripping: If your screen door is also meant to keep out drafts, consider adding weatherstripping for an extra seal.
Rescreening might seem like a daunting task, but with the right tools and materials, it becomes a manageable DIY project. Take your time to prepare, and you'll find the process much more rewarding.
Step-by-Step Guide to Rescreening Your Screen Door
Removing the Old Screen
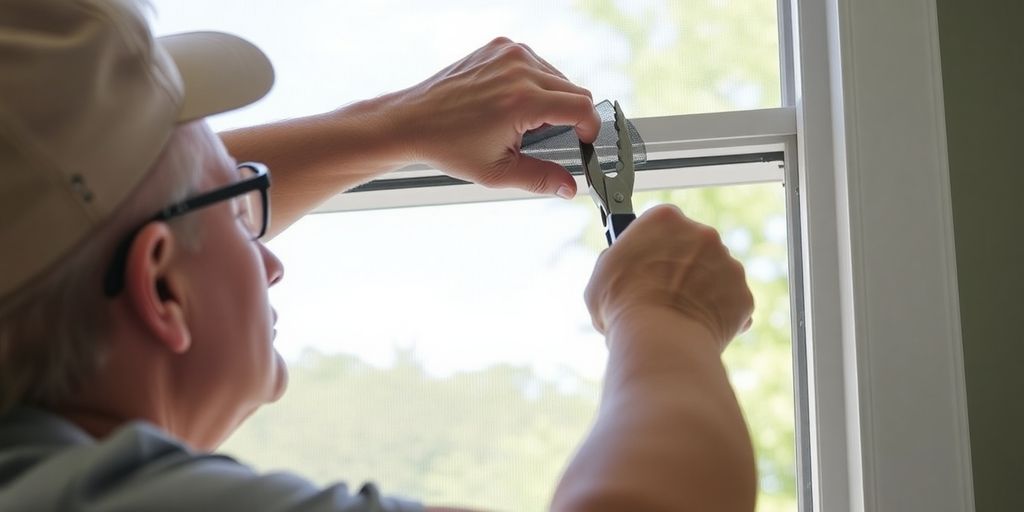
First things first, you need to get rid of that old, worn-out screen. Start by taking the screen door off its hinges or sliding it off the track if it's a sliding door. This makes the whole process way easier and safer. Grab a utility knife and carefully cut away the old screen. If there's spline holding it in, gently remove it to avoid damaging the frame. Keep the old spline handy because you'll need to measure it for the new one.
Installing the New Screen
Now that the old screen is out of the way, it's time to bring in the new one. Measure the door frame and cut the new screen material, leaving an extra inch on all sides. This extra bit ensures a snug fit. Lay the screen over the frame, making sure it’s taut but not too tight. If you're using spline, place it over the screen and press it into the frame with a spline roller. Alternatively, you can use a staple gun to attach the screen directly to the frame. Just make sure it stays tight and secure.
Finishing Touches and Reinstallation
With the screen firmly in place, trim any excess material with a utility knife or scissors. Be careful not to cut into the spline or staples. Once you’re satisfied with the fit, it’s time to put the door back. Reattach it to the frame, ensuring it opens and closes smoothly.
Pro Tip: After reinstalling, check the door's movement. If it’s not as smooth as you'd like, consider adjusting or replacing the door closer. For lightweight doors, the WRS 9" Pneumatic Screen Door Closer might be a good option to explore.
And there you have it, a fresh screen ready to keep those pesky bugs out while letting the breeze in. It's a bit of work, sure, but the result is totally worth it!
Troubleshooting Common Rescreening Issues
Dealing with Screen Wrinkles
Screen wrinkles can be a real eyesore and often happen if the screen wasn't stretched evenly during installation. To fix this, start by removing the spline from the frame. Gently pull the screen taut, ensuring it's evenly stretched across the frame. Reinsert the spline, using a spline roller to secure the screen in place. If the wrinkles persist, consider replacing the screen material as it might be too stretched or damaged.
Fixing Loose Screens
A loose screen is not just unattractive but can also let in insects. The key to a snug fit is in the spline. Check if the spline is properly seated in the groove. If not, press it firmly using a spline roller. For screens that continue to sag, a thicker spline might be necessary. Measure the groove and get a spline that fits more tightly.
Addressing Frame Damage
Sometimes the issue isn't with the screen itself but with the frame holding it. Inspect the frame for any bends or breaks. Minor bends can often be straightened with gentle pressure or a rubber mallet. For significant damage, you might need to replace the frame section. Ensure the new section matches the existing frame in color and material for a seamless look.
Regular maintenance and inspection can prevent most rescreening issues. By addressing small problems early, you can avoid more significant repairs down the line.
Maintenance Tips for Long-Lasting Screens
Regular Cleaning and Care
Keeping your screens clean is more than just about looks. Dust and debris can accumulate over time, which might lead to blockages or even damage. Grab a soft cloth or a handheld vacuum to gently remove any dirt. A mild detergent mixed with water works wonders for a deeper clean. Just be sure to rinse thoroughly to avoid soap residue.
When to Consider a Rescreen
Even the best-maintained screens will eventually show signs of wear. Look out for small tears or a sagging screen. If you notice these issues, it might be time to rescreen. Regular inspections can help catch these problems early, saving you time and hassle in the long run.
Protecting Your Screens from Damage
Prevention is key! Avoid leaning or placing heavy objects against your screens. If you have pets, consider installing pet-resistant screens to withstand their curiosity. Also, during harsh weather conditions, such as storms or heavy winds, it might be wise to remove or secure your screens to prevent damage.
A little maintenance goes a long way in extending the life of your screens. Regular checks and cleaning can keep them looking new and functioning well for years. Remember, a stitch in time saves nine!
Enhancing Your Home with Custom Screen Options
Exploring Different Screen Types
When it comes to customizing your home's screens, the choices are diverse and exciting. From traditional fiberglass to high-tech solar screens, there's something for everyone. Fiberglass screens are your classic choice, offering a balance of visibility and durability. For those looking to keep out the sun's harsh rays, solar screens are a great option, reducing heat and glare while maintaining privacy. Then there's the aluminum screen, known for its strength and resistance to rust, making it ideal for areas with high moisture. Each type has its pros and cons, so think about what matters most to you when selecting the right screen.
Benefits of Pet-Resistant Screens
Got pets? Then you know how they love to test the limits of your screens. Pet-resistant screens are designed with your furry friends in mind. These screens are crafted from tougher materials, which means they can withstand the occasional claw or paw. Not only do they help keep your pets safe inside, but they also prevent them from tearing through the screens, saving you from frequent repairs. Plus, they still provide excellent visibility and airflow, so you don't have to compromise on comfort.
Aesthetic Considerations for Screen Doors
Let's talk style. Screen doors aren't just functional; they can also add a touch of elegance to your home. Whether you prefer a sleek, modern look or something more rustic, there's a screen door design to match your taste. Consider the color and finish of the screen frame, as well as the type of mesh. Some homeowners choose decorative screen doors that feature intricate patterns or designs, adding a unique flair to their entrance. Remember, your screen door is one of the first things guests see, so make sure it reflects your personal style.
Custom screen options not only enhance your home's curb appeal but also improve its functionality. With the right choices, you can enjoy a more comfortable and stylish living space year-round.
Conclusion
Rescreening your screen door might seem like a daunting task at first, but with the right tools and a bit of patience, it's totally doable. Whether you're a DIY newbie or a seasoned pro, this guide has walked you through everything you need to know. From picking the right materials to the step-by-step process, you're now equipped to tackle this project head-on. Not only will you keep those pesky bugs out, but you'll also give your home a little facelift. So, roll up your sleeves and get started—your screen door will thank you!
Frequently Asked Questions
How often should I replace the screen on my door?
It's a good idea to check your screen door every year for any damage. Depending on how much it gets used, you might need to replace it every few years.
Can I use any kind of screen material for my door?
Not all screen materials are the same. Choose one that fits your needs, like a stronger screen for busy areas or a pet-proof one if you have animals.
What tools do I need to replace a screen?
At the very least, you'll need a sharp knife, screen material, and a tool to push the screen into place. Having more tools can make the job easier.
Can I replace the screen without taking the door off?
While you can, it's easier to take the door off. This gives you more room to work and helps you do a better job.
What if I break the door frame while taking off the old screen?
If you break the frame, you can usually fix it with wood filler or by replacing the broken part. Be careful when removing the old screen to avoid damage.
Does replacing a screen take a long time?
With the right tools and materials, replacing a screen usually takes one to two hours, depending on how handy you are.