Mastering the Art of How to Rescreen a Window Screen: A Comprehensive Guide
Rescreening a window screen is a useful skill that can save you money and keep your home comfortable. Whether your screen has been damaged by weather, pets, or just wear and tear, knowing how to fix it can make a big difference. This guide will walk you through the basics, the tools you'll need, and the steps to successfully rescreen a window screen. You'll also learn how to troubleshoot common problems and maintain your screens for the future.
Key Takeaways
- Understanding different types of window screens helps in choosing the right one.
- Regular maintenance keeps screens in good shape and extends their life.
- Having the right tools makes rescreening easier and faster.
- Measuring accurately is key to cutting the new screen correctly.
- Knowing when to call a professional can save time and effort.
Understanding the Basics of Window Screens
Window screens are essential for keeping bugs out while allowing fresh air to flow into your home. There are various types of window screens that cater to different needs and preferences. Here’s a quick overview:
Different Types of Window Screens
- Fixed Screens: These are permanently attached and cannot be removed easily.
- Retractable Screens: These can be pulled down or rolled up when not in use.
- Magnetic Screens: These use magnets to close gaps and are easy to install.
Common Materials Used in Window Screens
Most window screens are made from:
- Fiberglass: Lightweight and resistant to rust.
- Aluminum: Durable and offers good visibility.
- Pet Screens: Stronger material designed to withstand pets.
Benefits of Regular Screen Maintenance
Maintaining your window screens can lead to:
- Improved air flow
- Longer lifespan of the screens
- Better protection against insects
Regular maintenance can save you money in the long run by preventing the need for frequent replacements.
For those looking to upgrade their window hardware, this page offers a comprehensive range of window and door hardware, including window balances, sashes, screens, locks, and various accessories. It features products for different types of windows and doors, such as patio, closet, and storm doors, along with glazing and weatherstripping options. A full PDF catalog is also available for detailed product information.
Essential Tools and Materials for Rescreening

List of Required Tools
To successfully rescreen a window, you will need the following tools:
- Utility knife: For cutting the screen material.
- Screwdriver: To remove the screen frame.
- Pliers: Helpful for pulling out old screen staples.
- Measuring tape: To measure the screen dimensions accurately.
Choosing the Right Screen Material
When selecting screen material, consider:
- Fiberglass: This is a popular choice due to its durability and flexibility.
- Aluminum: Offers a stronger option but can be heavier.
- Pet-resistant screens: Ideal for homes with pets, as they are tougher against scratches.
Where to Purchase Quality Materials
You can find quality rescreening materials at:
- Local hardware stores
- Home improvement centers
- Online retailers like Window Hardware Direct, which offers a comprehensive range of window and door hardware products, including various types of window balances, sashes, screens, locks, and accessories. A full PDF catalog is available for detailed information.
Remember, using the right tools and materials can make your rescreening project easier and more effective!
Step-by-Step Guide on How to Rescreen a Window Screen
Removing the Old Screen
To start, you need to take out the old screen. Here’s how:
- Use a flathead screwdriver to pry off the screen frame.
- Carefully pull out the old screen material.
- Check the frame for any damage and repair if necessary.
Measuring and Cutting the New Screen
Once the old screen is removed, it’s time to measure and cut the new screen:
- Measure the frame’s dimensions accurately.
- Cut the new screen material to size, leaving a little extra for adjustments.
- Make sure to use a sharp utility knife for a clean cut.
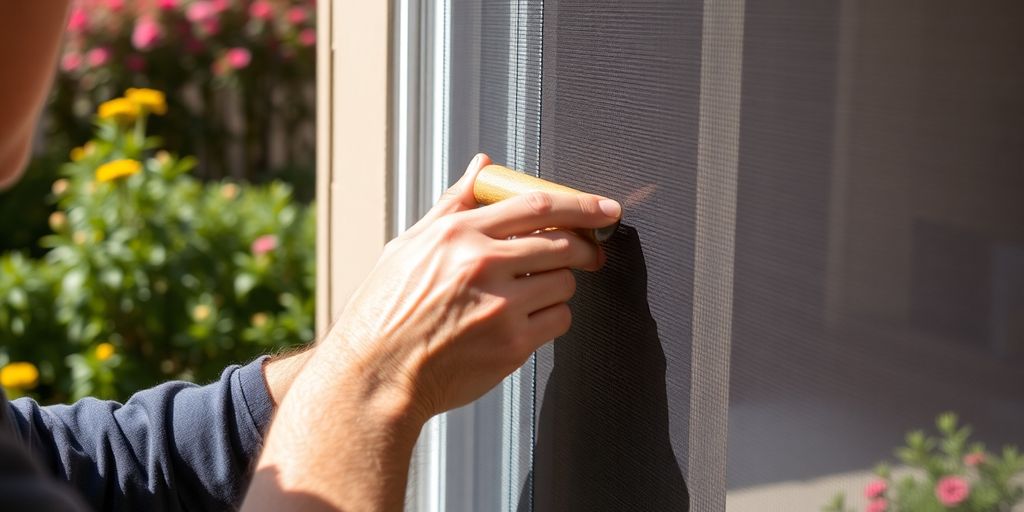
Installing the New Screen
Now, let’s put the new screen in:
- Lay the new screen over the frame.
- Use the wrs 5/32" x 1-3/32" screen plunger assembly to secure the screen tightly. This tool is great for keeping the screen in place and preventing it from loosening.
- Trim any excess screen material and reattach the frame.
Remember, a well-installed screen not only looks good but also keeps bugs out!
Troubleshooting Common Rescreening Issues
Dealing with Wrinkles and Bubbles
When you install a new screen, you might notice some wrinkles or bubbles. These can be annoying, but they are fixable! Here are some tips to help you out:
- Gently pull the screen tight while securing it.
- Use a flat tool to smooth out any bubbles.
- If wrinkles persist, you may need to remove the screen and re-install it.
Ensuring a Tight Fit
A snug fit is crucial for your window screen to work well. If it’s too loose, it can let bugs in. Here’s how to ensure a tight fit:
- Measure the frame accurately before cutting the new screen.
- Use a screen plunger assembly, like the wrs 5/32" x 1-3/32" 3 piece screen plunger assembly - 5 pack, to secure the screen tightly.
- Check the corners to make sure they are well-fitted.
Fixing Loose Screen Edges
Loose edges can be a common problem. Here’s how to fix them:
- Re-check the screen’s tension and adjust if necessary.
- Use additional staples or screen plunger assemblies to secure the edges.
- If the screen is still loose, consider replacing it with a new one.
Remember, taking your time during installation can help prevent these issues. A little patience goes a long way!
Maintaining Your Rescreened Window Screen
Regular Cleaning Tips
To keep your window screens looking great and functioning well, regular cleaning is essential. Here are some tips:
- Dust and dirt can accumulate, so use a soft brush or cloth to wipe them down.
- For tougher stains, a mixture of water and mild soap can help.
- Rinse with clean water and let them dry completely before reinstalling.
Protecting Screens from Damage
To ensure your screens last longer, consider these protective measures:
- Avoid using harsh chemicals that can degrade the screen material.
- Keep screens away from sharp objects that could cause tears.
- Store screens in a safe place during off-seasons to prevent bending or warping.
When to Consider Professional Help
Sometimes, it’s best to call in the experts. Here are signs that you might need professional assistance:
- If the screen is severely damaged or torn beyond repair.
- When you lack the tools or skills to fix the screen yourself.
- If you notice persistent issues after your attempts to maintain it.
Maintaining your rescreened window screen is crucial for its longevity. Regular care can save you time and money in the long run.
By following these simple steps, you can ensure your window screens remain in top shape for years to come!
Safety Tips for Rescreening Projects

Handling Tools Safely
When working on your window screens, always prioritize safety. Here are some key points to remember:
- Use tools as they are intended.
- Keep your workspace tidy to avoid accidents.
- Always cut away from your body when using sharp tools.
Working in a Safe Environment
Creating a safe workspace is crucial. Consider the following:
- Ensure good lighting to see what you’re doing.
- Work in a well-ventilated area, especially if using adhesives.
- Keep children and pets away from your work area.
Protective Gear Recommendations
Wearing the right gear can prevent injuries. Here’s what you should wear:
- Safety goggles to protect your eyes.
- Gloves to keep your hands safe from sharp edges.
- A dust mask if you’re sanding or using chemicals.
Remember, taking these precautions can help you avoid injuries and make your rescreening project go smoothly!
Cost-Effective Rescreening Solutions
When it comes to rescreening your windows, finding budget-friendly options is key. Here are some effective solutions to consider:
Budget-Friendly Material Options
- Look for discounted screen materials at local hardware stores.
- Consider using fiberglass screens, which are often cheaper than aluminum.
- Check online marketplaces for second-hand or surplus materials.
DIY vs. Professional Rescreening Costs
| Option | Estimated Cost |
|---|---|
| DIY Rescreening | $20 - $50 |
| Professional Service | $100 - $200 |
Doing it yourself can save you a lot of money! If you have the time and tools, rescreening your windows can be a fun project.
Maximizing the Lifespan of Your Screen
- Regularly clean your screens to prevent dirt buildup.
- Store screens properly during off-seasons to avoid damage.
- Inspect screens for tears or holes and repair them promptly.
Maintaining your screens not only keeps them looking good but also extends their life, saving you money in the long run.
By following these tips, you can effectively manage your rescreening project without breaking the bank. Remember, a little effort can lead to significant savings!
Conclusion
In conclusion, rescreening a window screen is a simple task that anyone can do with a little practice. By following the steps outlined in this guide, you can easily replace old or damaged screens and keep your home comfortable and bug-free. Remember to gather all the necessary tools and materials before starting, and take your time to ensure a good fit. With a bit of patience, you'll have your windows looking great in no time. So, roll up your sleeves and get started on your rescreening project!
Frequently Asked Questions
What is the purpose of a window screen?
A window screen helps keep bugs out while still letting fresh air in. It also helps protect your home from dirt and debris.
How often should I rescreen my windows?
You should check your window screens at least once a year. If they have holes or tears, it’s time to rescreen them.
What tools do I need to rescreen a window?
To rescreen a window, you will need a flathead screwdriver, scissors, a utility knife, and a screen roller.
Can I use any type of screen material?
Not all screen materials are the same. Make sure to choose a material that fits your window type and needs.
How do I know if my screen is installed correctly?
A properly installed screen should be tight and flat against the frame. There shouldn’t be any wrinkles or gaps.
Is it cheaper to do it myself or hire someone?
Doing it yourself is usually cheaper. However, if you’re not comfortable, hiring a professional might be a good choice.